How Can We Help?
How do I create and manage organizations and resources?
Creating Organizations and Resources
Within the Resource page, click on the green + Add Resource button at the top. The following screenshots demonstrate creating a new organization and new resource.
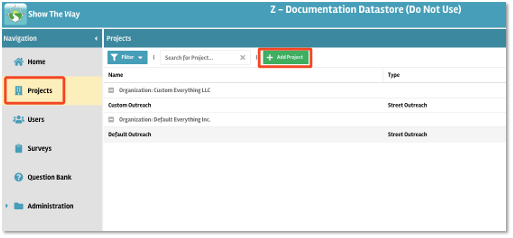
After clicking on +Add Resource, the pop up requires you to select an Organization, Resource Name, & Resource Type.

After clicking Add Resource in the pop-up, you should see the new Resource displayed in the Resource list.
Managing Organization Information
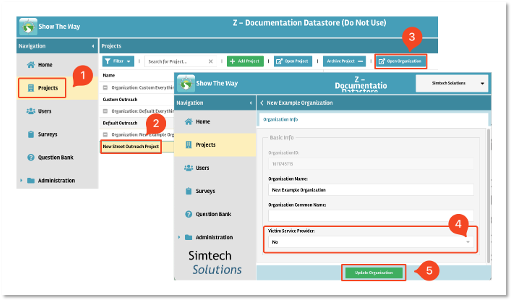
From the main Resource list, opening up the Organization using the button in the top row will allow you to indicate whether the Resource is a Victim Services Provider or not. This is where you can also update the organization name or add a Common Name if the organization uses one.
The image below is what you’ll see when you open a highlighted Resource from the main Resource list. Take note of 1) Resource Info, 2) Locations 3) Services 4) Surveys, 5) Funding, 6) Users, 7) Teams, and 8) Archive.
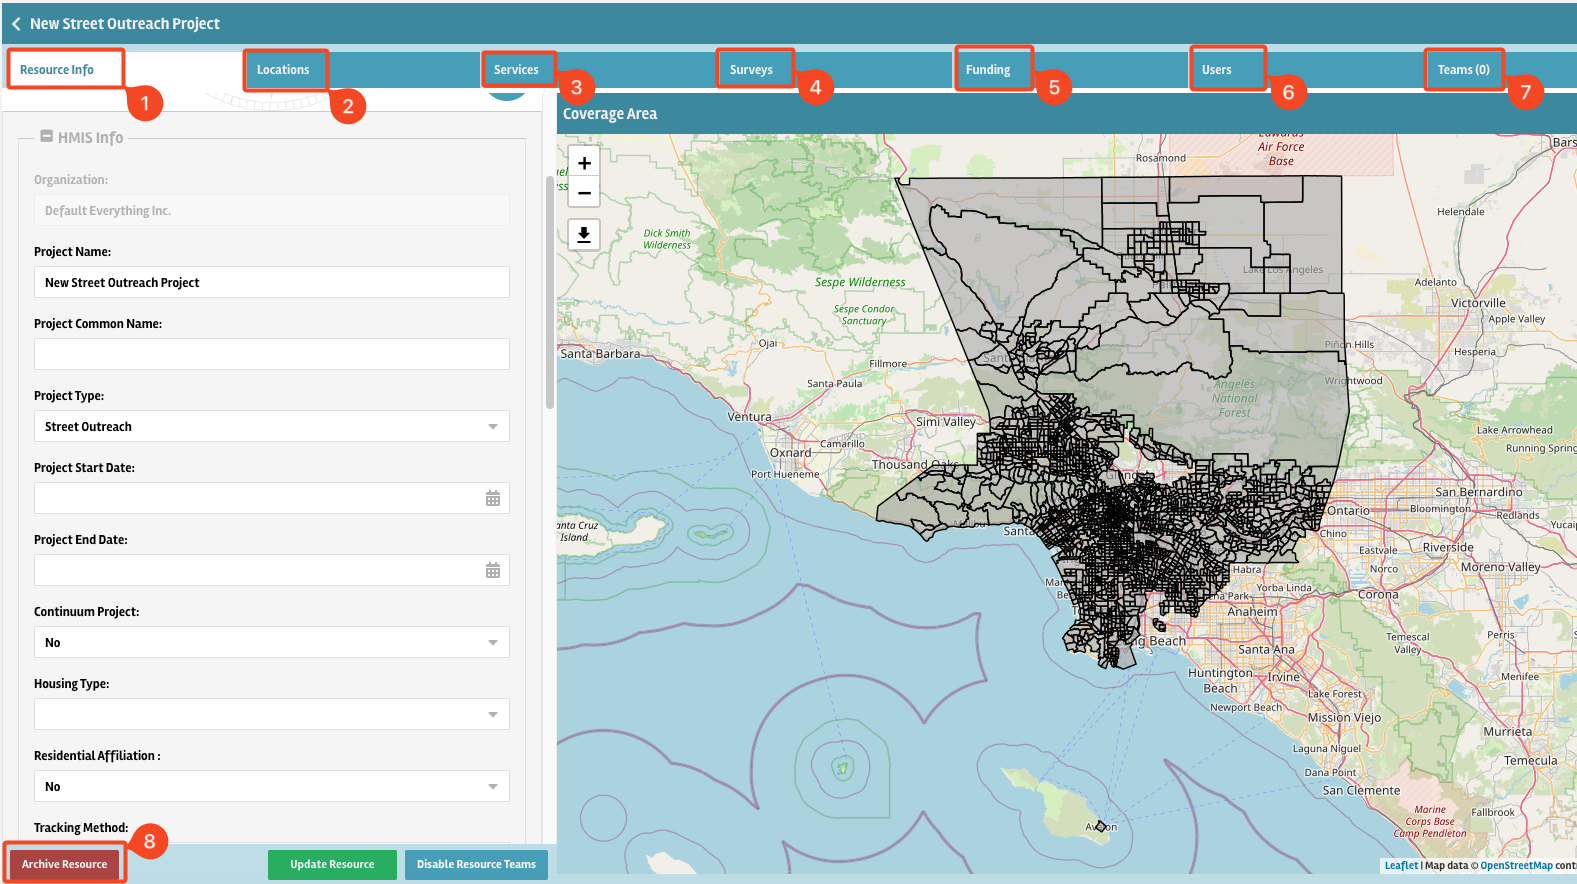
- Resource Info: this is the tab where all HUD PDDEs and Resource Directory information such as description, contact information, and hours are updated. This tab also includes the toggle options for Custom Resource Services and Public Portal
- Locations: this is where you will input additional address(es) if the Resource has multiple locations. This is also where CoC Code, Geocode, and Geography are entered for your Resources.
- Services: this is where you will manage adding custom services to a resource if not using the default services.
- Surveys: this tab is where you will add or remove surveys available to the Resource within the datastore.
- Funding: this tab is for entering and updating your funding source(s). Please note that some survey questions rely on specific funding sources for visibility.
- Users: in this tab you can add existing users to the Resource. Please note that users must be assigned to at least one Resource in a datastore for them to be able to create enrollments.
- Teams: this tab allows you to separate the users in your Resource into respective teams and assign coverage areas to those specific teams.
- Archive: this button archives a Resource. When a Resource is archived, it no longer displays in the Resource list, and any users assigned to it will no longer see it as an option in the app.
Resource Info
The Resource Info tab is where all your HUD PDDEs, Resource Directory details, and Resource Settings can be found. Except for bed inventory, all your Resource Directory details are contained here.
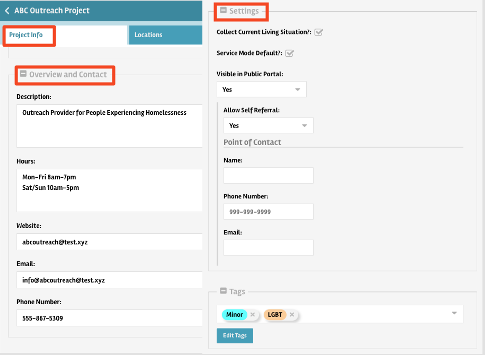
The Overview and Contact section is what will be visible on Resource views in the Resource Directory. Within the Settings:
-Service Mode Default determines whether the services a Resource offers are the datastore default, or whether it uses custom services (which you will need to define for the Resource).
-Visible in Public Portal controls if the Resource can be viewed when someone taps on “Find or Request Help” from the app login screen.
-Allow Self-Referral also refers to the Public Portal. This feature allows people in the public to submit a request directly to the Resource rather than to the community at-large.
-Point of Contact is for if you want to list a specific person as the public contact for the Resource.
Lastly, Tags are a way to search for Resources in the Resource Directory outside of Resource type, services offered, or organization/Resource name. For example, if someone is looking for shelters that serve youth or minors, you can add that as a tag to the Resource so when that keyword is searched for the Resource will show up in the results.
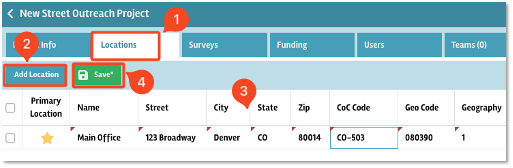
Locations
The Locations tab is where you enter the physical address of the Resource. This is also where you would enter CoC Code, Geocode, and Geography type. Without an address, Resources will still show up in the List View of the Resource Directory, but not in the Map View. Please note that all sheltered Resources must have a primary location entered to have a bed inventory.
After clicking on the Locations tab, click on Add Location, enter the relevant details, then click Save.
Services
By default, all resources will have predefined resources. These default resources can be used right away, but are not tied to HUD elements. To learn how to create custom services for your datastore and tie them to HUD services, please refer to this FAQ.
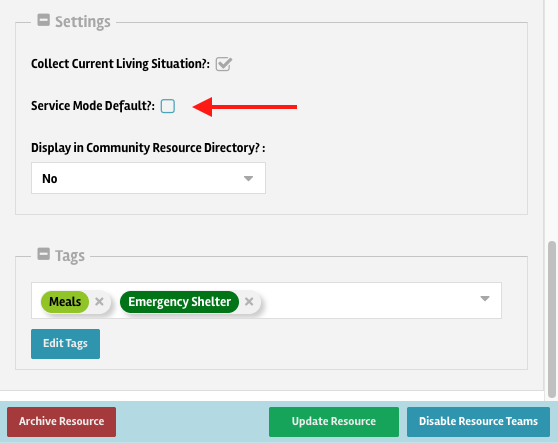
To use custom services, uncheck “Service Mode Default?” within the Resource Info tab, then click “Update Resource”. After making this change, the Services tab will be visible.
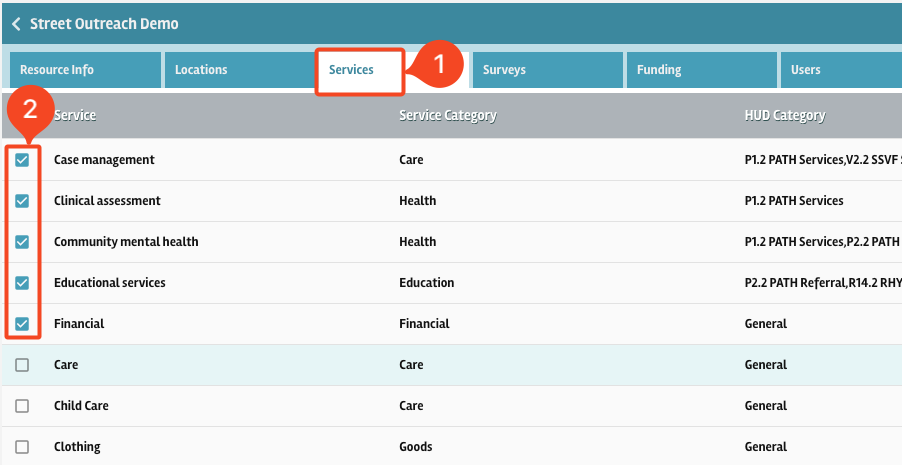
The Services tab is where you will add custom services to this Resource. Click the checkboxes next to the services you want made available to the resource. Unchecked services will not be accessible to users of this resource.
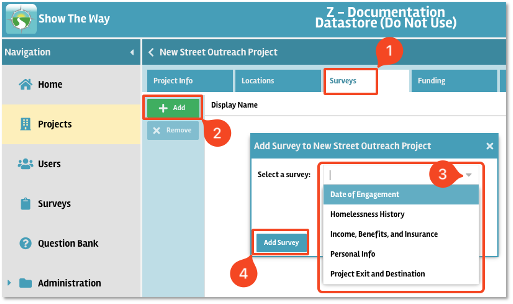
Surveys
Show the Way comes with predefined surveys that will collect all enrollment level information HUD requires. To learn how to view and manage surveys, please refer to this FAQ.
Surveys that already exist in your datastore can be added to the Resource from this tab. To do so, click on the + Add button on the left, select the survey you want to add from the drop-down, and then click Add Survey. The four surveys that need to be added to most Resources are Personal Info, Homeless History, Income Benefits Insurance, and Resource Exit & Destination. These four surveys contain all the required HUD questions for an enrollment.
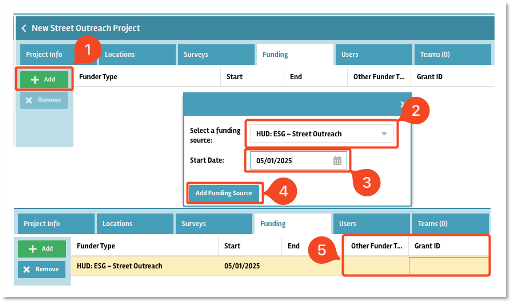
Funding Source
Survey question visibility is tied to funding source, so it’s important to add the funding source to newly created Resources. First, click the Add button to the left, select the funding source, and enter the start date. Then, click on Add Funding Source.
Once this is complete, you can then add additional information like Other Funder Type or Grant ID.
You can add multiple funding sources if necessary.
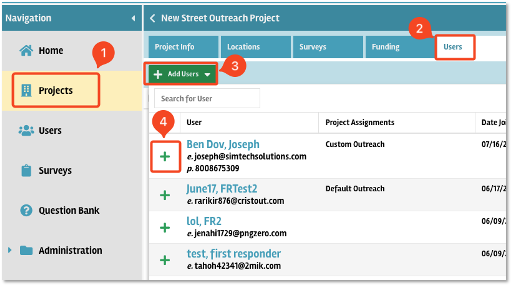
Users
Once users have been added to your datastore, you can then add them to Resources & Teams. First, click on the Users tab at the top, then click the + Add Users button. A list of all users in your datastore will populate. Click on the plus (+) button to the left of the users’ names you want to add to the Resource. After users are added to Resources their interactions with clients will be connected to that Resource.
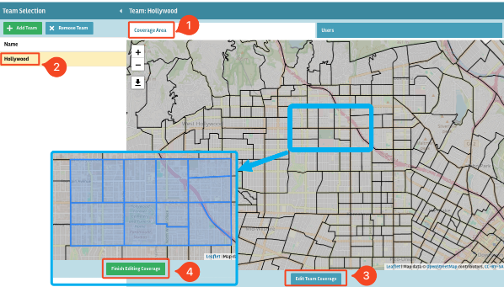
Resource Teams
If you choose to enable Resource teams, note that you’ll need to click that button first on the Resource Info tab before the Teams tab will be activated.
The main purpose of teams is to segment your users by relevant groupings. One example is if your outreach workers have specific coverage areas. Another would be different priorities; perhaps your Resource has one team for veteran outreach and one for youth outreach. However you choose to use it is up to you.
First, click on Add Team at the top left, then enter the name of the team and click Ok.
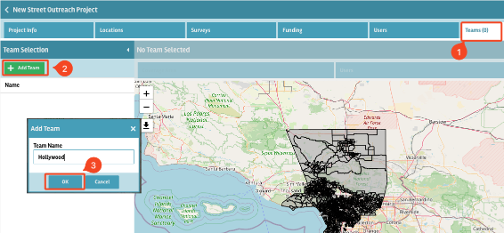
Next, click on the name of the newly-created team to highlight it. You can now edit the team’s coverage areas and add Resource users to the team. Team coverage areas selected will be visible in the app when workers open up the Resource Directory so they can easily see the boundaries of their Resource’s coverage. To add or remove census tracts, click on Edit Team Coverage at the bottom, then click on the tracts you want to include. When you’re done, click on Finish Editing Coverage to save.
Archive
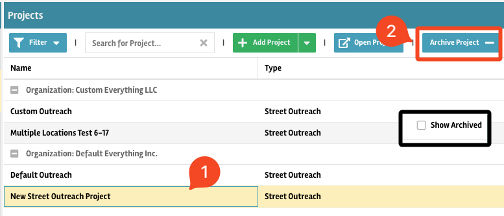
If a Resource is closed, or has mistakenly been added to your datastore, you can archive the Resource. To do so, click on the Resource name to highlight it, then click on the Archive Resource button at the top. If you find that you’ve accidentally archived a Resource, you can reactivate it by clicking on the Show Archived checkbox at the top right, then clicking Restore Resource.